Posts

Tiller Replacement

Image
Tiller: A lever attached to a rudder post/stock of a boat in order to provide the leverage for the helmsman to turn the rudder. Yes, it is possible to steer a sailboat without a rudder and tiller by using only the sails and the wind. But this sailor prefers to have the smooth wood of a finely crafted tiller in his hand. So in order to have the "smooth wood of a finely crafted tiller" part of that preference applicable to our boat I decided to refinish our "tiller". I say "tiller" in quotation marks because our tiller is actually a wheelbarrel handle that replaces the original tiller. What started out as a dingy, gray, rough piece of equipment intended for work around the yard is now a "finely crafted tiller" with a nice smooth finish and a golden hue reminiscent of the summer sun. I started refinishing the wood by sanding it down. I then applied four coats of semi-gloss Minwax Helmsman spar urethane. Between coats I sanded the urethane f

Wrapped & On the Hard

Image
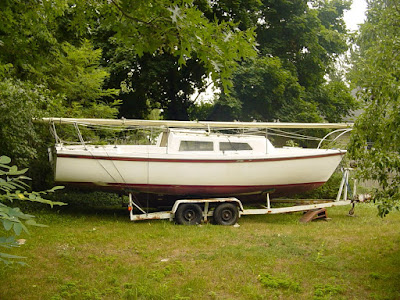
I spent a lot of laboriously joyful hours on the boat this summer and fall. I've made a lot of progress towards making her seaworthy for next season. She's also half-way presentable now, after 4 months of TLC. Even though our Helms 25 was never in the water during the 2007 season, it's still a sorrowful day when she has to be wrapped and stored, not to be uncovered again until spring of the new year. But don't shed a tear for me. I've got plenty of sailboat related activities to take care of over the winter. Here's a partial list: patch the sails, clean the sails, cover the foam cushions, begin sorting/organizing gear into bins, learn knot tying skills, and on and on and on. I'm actually looking forward to the sailing off-season and all of the things I'll learn, read, build and restore.

Thinking ahead...

Image
I was messing around with MS Paint and decided to see what color combination we might want to use when we paint the hull next spring. The line drawing in this post is something similar to what we're thinking of. Ideally, the blue would be a darker color, but you get the idea. The gelcoat is beyond repair and my several epoxy patch jobs have left the hull looking rather dull. So we'll definately be painting it early next spring before the splash day!

Quote of the Week

For this week's quote, I'll borrow from the 19th century writer/poet, Oliver Wendell Holmes. This is another quote about taking whatever life brings in stride, said with sailing metaphors, of course. To achieve, we must take the first step and keep moving! "I find the great thing in this world is not so much where we stand, as in what direction we are moving: To reach the port of heaven, we must sail sometimes with the wind and sometimes against it - but we must sail, and not drift, nor lie at anchor."  - Oliver Wendel Holmes

Cabin Fever

Image
This post is all about the cabin of our Helms 25. Just like the rest of the boat, the interior needs a lot of work. I wish I had taken picture of the cabin on the day we brought her home. I'm sure the parental controls on many of your computers would have kept you from seeing the pictures...that's how dirty she was! But now the interior has a had a thorough bath of bleach and Comet, along with two coats of paint on most surfaces. The ceiling and the floor still need to be painted. However, I'm still working on sealing the ceiling (tongue twister!) and will in all likelyhood use something like DriDeck flooring in the cabin sole. Most interior teak has also had one coat of MinWax Tung Oil applied. At least one more coat will be added before winter. I also need to build a dinnette table that will convert to a bed for one of the girls, resurface the cushions (Erin's goal for the winter!), and add a few things like a handheld-VHF holder, oil lamps, etc. The idea is to ke

Oh Beautiful Bilge!

Image
(Note: This blog post appeared in Latitudes & Attitudes - The Seafaring Lifestyle magazine on page 46 of the April 2008 edition) A clean, well-kept bilge says a lot about a boat's overall condition in my book. Clean bilges let you know that the ship's captain doesn't live by the philosophy of "Out of sight, out of mind". Sure, bilges inherently get dirty and wet quickly and easily. But if you start with a good foundation, they are easier to keep clean and much more hospitable during those claustrophobic moments when you have to cram yourself deep into the bowels of the vessel for maintenance and repair. I began restoring our boat's bilge by first removing any debris and lost hardware that had fallen in over the years. Then I scrubbed mightily with a solution of Comet, bleach and warm water. Next, I used my shop-vac to suck up smaller particles and make certain the entire bilge was dry. Luckily, about 99% of the bilge is fairly accessible on a Helms 25

Patching the Hull

Image
Today I started filling in the chipped areas of the gelcoat on the boat's hull. Most of the chips appear to be purely cosmetic, but there are a couple that are deep enough to expose the fiberglass matte underneath. I used two-part expoxy paste to fill in the chips. The paste goes on fairly easily with a disposable putty knife. Later, I'll sand the hardened epoxy smooth so that the hull is ready for a couple layers of new urethene paint in the spring.

Quote of the Week

Image
Here's this week's quote: "You can't run from the wind. You trim your sails, face the music and keep going." - Captain Christopher Shelton, S/V Albatross (from the movie White Squall) White Squall is one of my all-time favorite movies. Yes, I love the fact that it takes place on a sailboat in the Caribbean. But I also love the story of boys becoming men and people coming together as a tight-knit team to overcome extraordinary circumstances. Captain Christopher Shelton (brilliantly played by Jeff Bridges) has a very stern sense of wisdom. Almost all of his lines in the movie make for memorable quotes. I particularly like the life applications of the quote shown above. Life isn't about what happens to you, but rather how you react to what happens in your life.

I love epoxy!

Image
Today I began sanding some of the spots on the hull and deck that I earlier had patched with epoxy paste and putty. Frankly, I'm amazed with the ease of use and durability of these two epoxy products. Both go on easily, set in 2 hours and cure fully in 24 hours. They can even be applied, set and cured underwater. Amazing stuff! I first sanded the epoxy patches with 100 grit sandpaper on a sanding block and then smoothed things out with a finer grit sanding sponge. The picture above shows the deck looking much happier. Since patching, the deck seems sturdier and the cabin is dry. So far so good!

Quote of the Week

Image
I've decided to add a new feature to my blog...the "Quote of the Week"! (Note: I seriously doubt I'll be disciplined enough to make this a weekly feature, but nonetheless...) This will allow (force?) me to post at least once a week, even in the doldrums of the Michigan winter when progress on the boat will surely be slowed. So without further adieu, here's this week's quote: "Twenty years from now you will be more disappointed by the things you didn't do than by the ones you did do. So throw off the bowlines. Sail away from the safe harbor. Catch the tradewinds in your sails. Explore. Dream. Discover" - Mark Twain Obviously Twain's wisdom in the above quote extends far beyond mere sailing. The words above are also a metaphor for living life. If you love the water and adventure as I do, then you'll agree that Twain drove home his point perfectly with that quotation.

All Hands on Deck!

Image
This blog post is a general update regarding the condition of the deck. I'm slowly starting to make some progress on repairing, sealing and re-equipping the deck and its' associated hardware. As I've written about in previous posts, several of the stanchions and chainplates have already been re-bedded. I've also painted and added new weatherstripping to the hatches. Last night I removed the rotted and/or broken teak handrails. After removal, I placed a piece of tape over the hole in the interior cabin ceiling. Then I filled the holes on the exterior with epoxy putty. The tape kept the putty from pushing out through the bottom of the holes. When the putty cures completely, I'll then fill the holes from inside the cabin to seal them for winter. Hopefully I'll get my hands on some new 7-loop handrails to install next spring. Other remaining deck tasks: a) replace the mast step plate b) re-bed and/or remove cleats c) replace rotted companionway hatch slides

Rebedding Deck Hardware

Image
After a slight blog hiatus due to vacation, weather and work, I'm finally back to making repairs/updates to our Helms 25.  This week I'm focusing on rebedding most of the deck hardware to fix water leaks in the cabin, improve safety (lifeline stanchions, chainplates, etc.) and prevent any further water leaks into the balsa deck core. Speaking of deck core, ours is spongy and wet in many places on the coach roof and some of the sidedecks.  However, we will likely not be ripping up the top layer of fiberglass, removing the old wet core and then relaying new fiberglass, gelcoat and paint.  We realize this could be a mistake if the deck rot is worse than we think and it (God forbid!) leads to a de-masting or cleats/chainplates/toerails/blocks/winches/etc. breaking loose. The truth is, we just can't afford to re-core the deck and probably don't have the tools/experience to do it for this boat. Back to rebedding the deck hardware... I started with a couple of pieces of

Deck Hatches

Image
I began work on the deck hatches. Cosmetically, they are in very poor condition. The paint is chipped and flat, the edges are chipped and the weather stripping is rotten and/or missing. I began by removing both hatches. The Helms 25 has a small forward hatch above the v-berth and a second larger hatch just forward of the mast. I then removed the old weather stripping and gave both hatches two coats of "Kilz" oil-based primer. Each hatch will eventually also get new non-skid on the tops and a coat or two of the latex paint I'm using on the rest of the cabin for the underside of the hatches. Next, I purchased new water-proof weather stripping with self-adhesive backing. It fit perfectly into the groove where the old weather stripping had been. Both hatches look much better (even with just the two coats of primer) and seal much tighter. My main priority was to get a good seal before fall and winter arrive. I'll address other leaky areas that need resealing in futur

Getting a Sailing Fix

Image
This past week I had the very fortunate opportunity to be staying in Horton Bay on Lake Charlevoix in northern Michigan. For those that don't know, northern Michigan is a boater's paradise with hundreds of beautiful inland lakes, plenty of wilderness, several quaint and/or touristy towns, and of course access to the Great Lakes. I consider Lake Charlevoix (say "Sharla-voy") to be the prized jewel of all northern Michigan inland lakes. The lake has a surface area of 17,200 acres and 56 miles of gorgeous shorline. The outflow of Lake Charlevoix is the small but very picturesque Round Lake, which then flows into Lake Michigan. The water is always turqouise green and crystal clear. The winds are fair and the sailing is delightful. While staying at my in-laws cottage in Horton Bay (Ernest Hemmingway's stomping ground in his early years!), I was able to sail Lake Charlevoix on a Laser. If you haven't sailed a Laser, you owe it to yourself to try one out. The rai

Teak cleaning and restoration

Image
Today I began the process of restoring some of the old teak on our boat. The exterior teak consists of two 7-rung handrails, companionway doorslides, companionway trim, companionway door, and two recessed cockpit bins. The interior teak consists of two bulkheads, a mast support spindle, shelf rails, and miscellaneous trim. I began by applying a mixture of 75% detergent and 25% bleach, boosted with a few splashes of TSP to the teak. This mixture should do a good job of cleaning and lightening the teak. Next, I plan to brush on three coats of tung oil to restore the beautiful grain patterns and protect the wood. Supposedly tung oil will not darken the teak the way linseed oil will. However, both oils will need to be reapplied periodically to maintain the look and protection. Varnish would be better suited to exterior teak applications, but the cost and application process is not to my liking for this particular boat. We'll continue the use of tung oil and re-evaluate in a year

References and Resources for Sailboat Restoration

Image
We will be using several books, magazines and online resources for references as we begin to breath new life into this old sailboat. I'd like to mention a couple books that we highly recommend for others who are beginning a similar sailboat restoration project. Both books are written by Don Casey. The first is titled "This Old Boat". This book walks the reader step by step through the process of restoring an old sailboat "on a shoestring budget". Perfect! The second is called "Sailboat Refinishing". This is an excellent book about refinishing decks, hulls, woodwork and a number of other sailboat structures.

History of Helms Yachts

Image
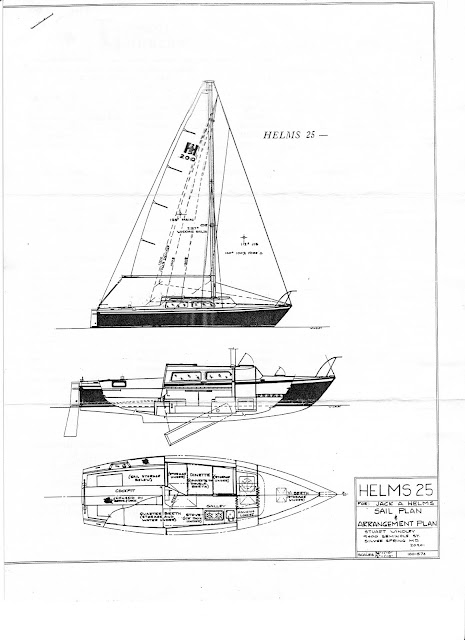
Helms Yachts were built in South Carolina during the 1970s and early 1980s by Jack Helms. Only 600-800 boats were built. Jack supposedly peronally delivered every boat. The company's first boat was the Helms 25. Jack Helms said that he wanted to create a "better Catalina 22." Sometime in the 1970s a 25 won its class in the MORC. Eventually a 27 was added, followed by the 30 which was eventually replaced by a 32 footer. Several hundred of the 24, 25, 27 and 30 foot boats were built, but only 10 of the 32 foot were ever built. As previously mentioned, the Helms 25 was created to be a "better Catalina 22". The Helms 25 looks very similar (almost identical) to the Catalina 22 except for a 3 foot extension to the cockpit. This extension allows the Helms to seat 6 in the cockpit while cruising or four while racing. The C22 only seats a maximum of 4. Both boats are swing keel designs which makes them popular with trailer-sailors. They also feature a tiller-rudder

The Dream Begins

Image
The Dream Begins... We did it. We bought our first sailboat. She's a total project boat that needs a lot of our love. Luckily we're itching to give it! Technically, she's a 1972 Helms 25 (Hull Number 44). Her stats are as follows: LOA: 24'11" Beam: 7' Draft: 1'8" (keel up) or 6' (keel down) Displacement: 3,150 lbs Design: Swing keel cruiser In reality, the dream began long ago. I was raised a powerboater and have always had the urge to buy my own boat and seek adventure. Fortunately, my wife shares (tolerates) my passion for adventure, the water and boats. This blog will document the restoration process of our Helms 25 and begin to tell the story of our dream to sail around the world.